Creating a Cross-Platform App for Windows Phone 8 and Windows Store (PCL, MvvmCross)
If you haven't checked it out yet, Portable Class Libraries (PCLs) make it possible to write cross-platform .NET applications targeting multiple platforms and using the same code logic base. Combining this with Xamarin, you can target other platforms such as iOS, Android and Mac. That's right, it means you can write C# code for those platforms. Pretty amazing, right? PCL comes with Visual Studio 2012. In the following tutorial, I explain how you can create a cross-platform app for Windows Phone 8 and Windows Store, using PCL and the MvvmCross framework to separate concerns.
Setting up the Environment
PCL comes out of the box with Visual Studio 2012, but I recommend that you use Visual Studio 2013. The reason is that you can choose to include the Windows Phone 8 SDK upon installation, and the Windows Store templates come out of the box with VS 2013. The Windows Phone 8 emulator uses Hyper-V, and since we will be creating an app for Windows Store, that means you'll need at least Windows 8 Professional installed on your machine. Once you've got VS 2013 with the Windows Phone 8 SDK installed on your Windows 8 Professional OS, we're ready to get started.
Let's Get Started
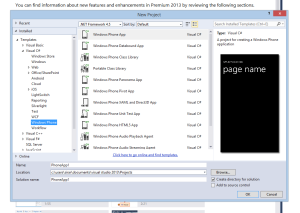
Start Visual Studio 2013 and create a new project, choose Windows Phone:
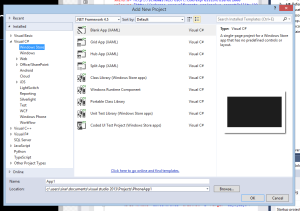
Right click the solution and choose Add -> New Project... Choose Windows Store:
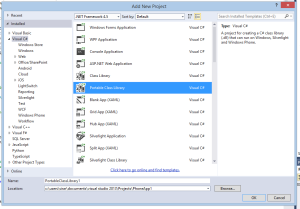
Right click solution again and choose Add -> New Project... Choose Portable Class Library:
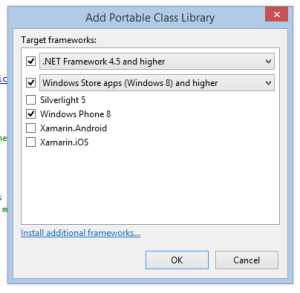
Make sure the following are checked:
Note: You can target other platforms by installing Xamarin, but this is not required in this tutorial.
We will start by setting up our PCL. First, delete Class1.cs. Now right click the PCL project and choose Manage NuGet Packages… Search for “mvvm cross” and install “MvvmCross” through NuGet. Delete the ToDo-MvvmCross folder. Go to FirstViewModel.cs and change “Hello MvvmCross” to “Hello World!”:
public class FirstViewModel : MvxViewModel
{
	private string _hello = "Hello World!";
        public string Hello
	{
		get { return _hello; }
		set { _hello = value; RaisePropertyChanged(() => Hello); }
	}
}
Take a look at the App.cs class, this is the start up class of our library that registers our view models:
public class App : Cirrious.MvvmCross.ViewModels.MvxApplication
{
   public override void Initialize()
   {
      CreatableTypes()
         .EndingWith("Service")
         .AsInterfaces()
         .RegisterAsLazySingleton();

         RegisterAppStart<ViewModels.FirstViewModel>();
   }
}
We’ve finished setting up our PCL. Now navigate to the Windows Phone project and delete MainPage.xaml. Right click the project and choose Manage NuGet Packages… Search for “mvvm cross” and install “MvvmCross” through NuGet. Delete the ToDo-MvvmCross folder. Now right click References and choose Add Reference… Click on Solution -> Projects and choose the PCL project. Now navigate to the Setup.cs class, this class sets up the data binding to our view model among other things. Change it to look like this:
public class Setup : MvxPhoneSetup
{
    public Setup(PhoneApplicationFrame rootFrame) : base(rootFrame)
    {
    }

    protected override IMvxApplication CreateApp()
    {
        return new PortableClassLibrary1.App();
    }

    protected override IMvxTrace CreateDebugTrace()
    {
        return new DebugTrace();
    }
}
Now we need to make sure that our Phone app uses Setup.cs. To do that, navigate to App.xaml.cs and add this to the end of the constructor:
var setup = new Setup(RootFrame);
setup.Initialize();
Add this field to the class:
private bool _hasDoneFirstNavigation = false;
Now add the following code to the Application_Launching method:
RootFrame.Navigating += (navigatingSender, navigatingArgs) =>
{
    if (_hasDoneFirstNavigation)
          return;

    navigatingArgs.Cancel = true;
    _hasDoneFirstNavigation = true;
    var appStart = Mvx.Resolve<IMvxAppStart>();
    RootFrame.Dispatcher.BeginInvoke(() => appStart.Start());
};
Now take a look at FirstView.xaml and how it binds to our view model:
<views:MvxPhonePage
    x:Class="PhoneApp1.Views.FirstView"
    xmlns="http://schemas.microsoft.com/winfx/2006/xaml/presentation"
    xmlns:x="http://schemas.microsoft.com/winfx/2006/xaml"
    xmlns:phone="clr-namespace:Microsoft.Phone.Controls;assembly=Microsoft.Phone"
    xmlns:shell="clr-namespace:Microsoft.Phone.Shell;assembly=Microsoft.Phone"
    xmlns:d="http://schemas.microsoft.com/expression/blend/2008"
    xmlns:mc="http://schemas.openxmlformats.org/markup-compatibility/2006"
    xmlns:views="clr-namespace:Cirrious.MvvmCross.WindowsPhone.Views;assembly=Cirrious.MvvmCross.WindowsPhone"
    FontFamily="{StaticResource PhoneFontFamilyNormal}"
    FontSize="{StaticResource PhoneFontSizeNormal}"
    Foreground="{StaticResource PhoneForegroundBrush}"
    SupportedOrientations="Portrait" Orientation="Portrait"
    mc:Ignorable="d"
    shell:SystemTray.IsVisible="True">

    <!--LayoutRoot is the root grid where all page content is placed-->
    <Grid x:Name="LayoutRoot" Background="Transparent">
        <Grid.RowDefinitions>
            <RowDefinition Height="Auto"/>
            <RowDefinition Height="*"/>
        </Grid.RowDefinitions>

        <!--TitlePanel contains the name of the application and page title-->
        <StackPanel x:Name="TitlePanel" Grid.Row="0" Margin="12,17,0,28">
            <TextBlock x:Name="ApplicationTitle" Text="MY APPLICATION" Style="{StaticResource PhoneTextNormalStyle}"/>
            <TextBlock x:Name="PageTitle" Text="page name" Margin="9,-7,0,0" Style="{StaticResource PhoneTextTitle1Style}"/>
        </StackPanel>

        <!--ContentPanel - place additional content here-->
        <Grid x:Name="ContentPanel" Grid.Row="1" Margin="12,0,12,0">
		   <StackPanel>
			<TextBox Text="{Binding Hello, Mode=TwoWay}" />
			<TextBlock Text="{Binding Hello}" />
		   </StackPanel>
        </Grid>
    </Grid>

</views:MvxPhonePage>
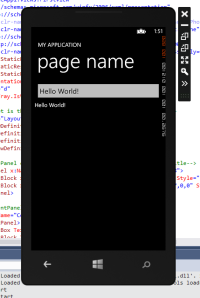
That's it! Build and run the Phone project, the emulator should start up:
Let’s move on to the Windows Store project. Delete MainPage.xaml, right click the project and choose Manage NuGet Packages… Search for “mvvm cross” and install “MvvmCross” through NuGet. Delete the ToDo-MvvmCross folder. Now right click References and choose Add Reference… Click on Solution -> Projects and choose the PCL project. Now navigate to the Setup.cs class, and make sure it looks correct:
public class Setup : MvxStoreSetup
{
        public Setup(Frame rootFrame) : base(rootFrame)
        {
        }

        protected override IMvxApplication CreateApp()
        {
            return new PortableClassLibrary1.App();
        }

        protected override IMvxTrace CreateDebugTrace()
        {
            return new DebugTrace();
        }
}
Navigate to App.xaml.cs and remove the following code from the OnLaunched method:
if (rootFrame.Content == null)
{
    // When the navigation stack isn't restored navigate to the first page,
    // configuring the new page by passing required information as a navigation
    // parameter
    rootFrame.Navigate(typeof(MainPage), e.Arguments);
}
Add the following to the end of the OnLaunched method:
var setup = new Setup(rootFrame);
setup.Initialize();

var start = Mvx.Resolve<IMvxAppStart>();
start.Start();
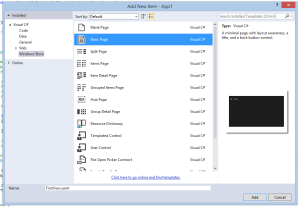
Delete FirstView.xaml. Right click the Views folder and add a new Basic Page, call it “FirstView.xaml”:
You’ll note that a new folder called Common with helper classes was added to the project. Go to FirstView.xaml.cs and make the class inherit from MvxStorePage instead of Page. Remove the methods OnNavigatedTo and OnNavigatedFrom methods. The class should now look like the following (comments removed):
public sealed partial class FirstView : MvxStorePage
{
        private NavigationHelper navigationHelper;
        private ObservableDictionary defaultViewModel = new ObservableDictionary();

        public ObservableDictionary DefaultViewModel
        {
            get { return this.defaultViewModel; }
        }

        public NavigationHelper NavigationHelper
        {
            get { return this.navigationHelper; }
        }


        public FirstView()
        {
            this.InitializeComponent();
            this.navigationHelper = new NavigationHelper(this);
            this.navigationHelper.LoadState += navigationHelper_LoadState;
            this.navigationHelper.SaveState += navigationHelper_SaveState;
        }

        private void navigationHelper_LoadState(object sender, LoadStateEventArgs e)
        {
        }

        private void navigationHelper_SaveState(object sender, SaveStateEventArgs e)
        {
        }
}
Now navigate to FirstView.xaml and reflect the changes that you made in the code-behind file, so your view looks like the following:
<views:MvxStorePage
    x:Name="pageRoot"
    x:Class="App1.Views.FirstView"
    DataContext="{Binding DefaultViewModel, RelativeSource={RelativeSource Self}}"
    xmlns="http://schemas.microsoft.com/winfx/2006/xaml/presentation"
    xmlns:x="http://schemas.microsoft.com/winfx/2006/xaml"
    xmlns:local="using:App1.Views"
    xmlns:common="using:App1.Common"
    xmlns:d="http://schemas.microsoft.com/expression/blend/2008"
    xmlns:mc="http://schemas.openxmlformats.org/markup-compatibility/2006"
    xmlns:views="using:Cirrious.MvvmCross.WindowsStore.Views"
    mc:Ignorable="d">

    <Page.Resources>
        <!-- TODO: Delete this line if the key AppName is declared in App.xaml -->
        <x:String x:Key="AppName">My Application</x:String>
    </Page.Resources>

    <!--
        This grid acts as a root panel for the page that defines two rows:
        * Row 0 contains the back button and page title
        * Row 1 contains the rest of the page layout
    -->
    <Grid Background="{ThemeResource ApplicationPageBackgroundThemeBrush}">
        <Grid.ChildrenTransitions>
            <TransitionCollection>
                <EntranceThemeTransition/>
            </TransitionCollection>
        </Grid.ChildrenTransitions>
        <Grid.RowDefinitions>
            <RowDefinition Height="140"/>
            <RowDefinition Height="Auto"/>
        </Grid.RowDefinitions>

        <!-- Back button and page title -->
        <Grid>
            <Grid.ColumnDefinitions>
                <ColumnDefinition Width="120"/>
                <ColumnDefinition Width="*"/>
            </Grid.ColumnDefinitions>
            <Button x:Name="backButton" Margin="39,59,39,0" Command="{Binding NavigationHelper.GoBackCommand, ElementName=pageRoot}"
                        Style="{StaticResource NavigationBackButtonNormalStyle}"
                        VerticalAlignment="Top"
                        AutomationProperties.Name="Back"
                        AutomationProperties.AutomationId="BackButton"
                        AutomationProperties.ItemType="Navigation Button"/>
            <TextBlock x:Name="pageTitle" Text="{StaticResource AppName}" Style="{StaticResource HeaderTextBlockStyle}" Grid.Column="1"
                        IsHitTestVisible="false" TextWrapping="NoWrap" VerticalAlignment="Bottom" Margin="0,0,30,40"/>
        </Grid>
        <Grid x:Name="ContentPanel" Grid.Row="1" Margin="12,0,12,0">
            <StackPanel>
                <TextBox Text="{Binding Hello, Mode=TwoWay}" />
                <TextBlock Text="{Binding Hello}" />
            </StackPanel>
        </Grid>
    </Grid>
</views:MvxStorePage>
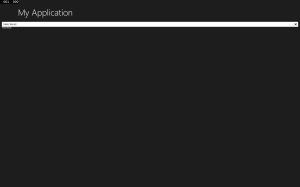
Build and run the Store app:
And we are done! Both applications now use the logic written in the Portable Class Library, and you only need to write the logic once. Pretty cool! Now you can go ahead and make some awesome cross-platform apps. :)
