Securing your front-end payload with RSA encryption using OpenSSL, jsencrypt and Azure Key Vault
Security is very important in software development, I have been working intensively on security recently and I thought that I would write a blog post on encryption. Even though your network traffic is usually secured with SSL encryption, there is a high chance that a hacker will use SSL decryption tools and be able to sniff your traffic in clear text. In such cases it’s very smart to protect your payload with additional encryption. In this blog post I will explain how to encrypt the payload coming from your front-end with RSA encryption and how to decrypt it in your back-end.
In this case we assume that our front-end is a React application with ASP.NET Core as the back-end, so in this case we need to do RSA encryption in JavaScript and RSA decryption in C#.
In JavaScript we can use jsencrypt to do the RSA encryption, which I think is a good library for doing this. The typical encryption/decryption flow looks like this:
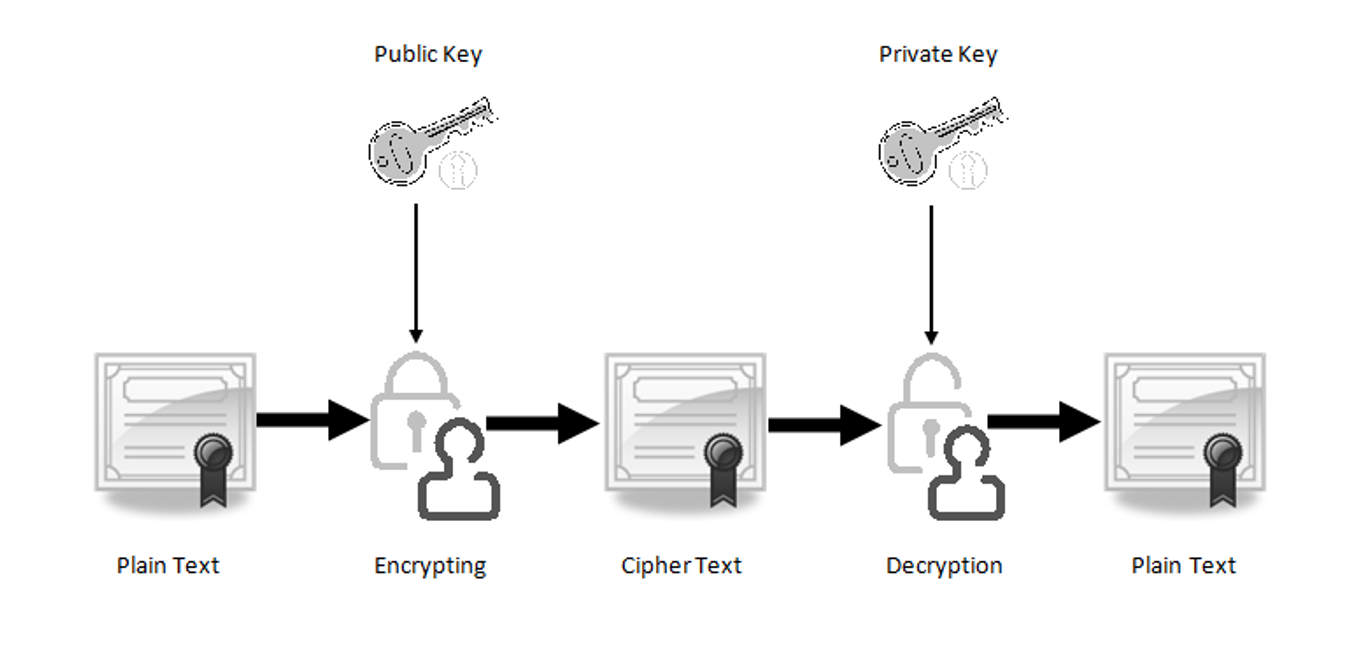 A typical encryption/decryption flow using public and private keys. Figure credit: SSL2Buy.
A public key, known to all users of your application, is used for encryption. A private key, known only to you - the provider - is used for decryption. So before we get started, we need to generate public/private key pairs and a certificate. OpenSSL is an excellent tool for doing this, so with this tool we can create a private key and certificate PEM files:
openssl req -newkey rsa:1024 -nodes -keyout private_key.pem -x509 -days 365 -out certificate.pem
Make note of the arguments; we’re applying RSA 1024-bit encryption. When you run this command, you get asked to provide personal information that will be incorporated into the certificate:

We then create a public key PEM file using the private key and certificate that we created previously:
openssl x509 -pubkey -noout -in certificate.pem > public_key.pem
Finally, we export a certificate PFX file using the private key and certificate PEM files:
openssl pkcs12 -export -out certificate.pfx -inkey private_key.pem -in certificate.pem
When exporting the certificate, you’ll be asked to set a certificate password. Give it a good password, then store this password somewhere safe such as in a secret in Azure Key Vault:

Using PowerShell, we then convert the certificate PFX to a base64 string. We need to do that so we can store the base64 string in a secret in Azure Key Vault for decryption later:
$fileContentBytes = get-content 'certificate.pfx' -Encoding Byte
[System.Convert]::ToBase64String($fileContentBytes) | Out-File 'certificate_base64.txt'
Open public_key.pem using a text editor to see how it looks like:
-----BEGIN PUBLIC KEY-----
MIGfMA0GCSqGSIb3DQEBAQUAA4GNADCBiQKBgQDJ9O7Zxr7yviIEIthxrKfGQjf6
sIkv9SmbFmc54YSrpWRhU+TU0jB+X3N/fQWsTE6xxnc0U39ezmsTSrb3hnXVX7Th
aoATfY0s8gi2zKVrU0GskSJAZZXD6xRoOi+KEBMkIF7QHF3WKT+h4xvmQHlXtG53
PTPLzdrob0i3Tt2ZfwIDAQAB
-----END PUBLIC KEY-----
Also open private_key.pem using a text editor to see how that looks like:
-----BEGIN PRIVATE KEY-----
MIICdwIBADANBgkqhkiG9w0BAQEFAASCAmEwggJdAgEAAoGBAMn07tnGvvK+IgQi
2HGsp8ZCN/qwiS/1KZsWZznhhKulZGFT5NTSMH5fc399BaxMTrHGdzRTf17OaxNK
tveGddVftOFqgBN9jSzyCLbMpWtTQayRIkBllcPrFGg6L4oQEyQgXtAcXdYpP6Hj
G+ZAeVe0bnc9M8vN2uhvSLdO3Zl/AgMBAAECgYALZH7I2DZTWThwBUsydmvsejXQ
NX83rlvPfN8L29XxHN5hwyrIeqbzqgzI51OXmaJi0vBMil1ICtrtdqyFoBcrfYR7
HiSi8Zjd7XBJyhKihUDiTxGYSo4tJ0x2asEjmvgL0h8EOR5IIKoaH4NJvKFpml7D
prUC9a6hffuEeMER6QJBAPXAlAEKQY9lYKS1Qc7NppDscUDFCMAOGqt8vtdrmN3b
Kuup81NOhUgl9+L42X3zjm/gxtLU8SYnRhUAqwU5ViMCQQDSYNXINHJJS6F8vn6X
eAfL3FwR+xJh2EhpGNLrAHALz8YXW5TUhQQXBsZZOikWOti5e8DLRKIaVMGKMtPV
es71AkEAnJALun3mNozHfSdcvXuW2k1H+ZONd42EwCvBCUyrHuw589laA4DKuKQ3
wIn5RZyc6fmxsS+oUj5DD65VRga5MQJALa0SnV4tthYyoJfnelF4N93HK6w8aHwB
9LeMC7PTn+zjkGy02pNquOkipXrIMuhh55uj1z42h8sBHlU8wuvgBQJBANHu65u1
QFqmF3U8ALgde6UGQozSHaGove8KsSig4LnsFd6+jap+1vlXVYgPExAFwK3cijdc
Gbp21YPuscZxeZ4=
-----END PRIVATE KEY-----
Finally, open certificate_base64.txt:
MIIHKQIBAzCCBu8GCSqGSIb3DQEHAaCCBuAEggbcMIIG2DCCA9cGCSqGSIb3DQEHBqCCA8gwggPEAgEAMIIDvQYJKoZIhvcNAQcBMBwGCiqGSIb3DQEMAQYwDgQIRq7/nZ8K+28CAggAgIIDkJccOCPL45ImEyHrQgN3ludoi1w4tzFuwBWXxfLxW18BX77zCa64tHFxWDBigoW88jXI8L9CRF3CTJyzSu3gCYzyanGGdxx7qcFiZ4gdFsS1UOh1tpWbwv9tBlv5sDy6Mhig3CC352xrpRssB71Uh4lkMW1h43mDrw56RbYumJejgWlI5ddvVgHzPW2I71vyoTJMUgpZxRMUGXfs/q3vfYaVkmzdtkFI8qTPVY3BIJ4lYtcD88iqPbDaV1avROiaGg5z5Hkqt5BncAMYQrChWyaonwnpU+2BO3+egnJdJqySqVHVHHzyu5cjjaesj5vLEpEtLmrNVtJEGmr63+75W1cW236QdsvT8o77TaKJrF6UBFLCGRal6v68FZXwkauadnCSWE1dI4HI4LbjqFtsfuYvs0Rm6qdW7C353twXuwWyAmS8LeBBtu+GwVs5BK5L/dp90riU5Kz0RgjWQ3qX0pII2yA74dKuV3Ei1h2X8EtC65h1aFLLKhwQ4h9W3WF7HnebjsV+wju4Z8aApAh2wdfMvwXRUPLSQ3pZmsIlkUSfMe3SNPLZstdTd/MRfizzX7W5rjV6g6Q46jYYg7yWYzSn1/xV9vXn+DylKw3CrkobqpWm5LOx9nra5NH7hCz0v7ZXeYMHyBLGtJ3+P14OJHYUyN7o3KjCqhVWVMMFXDCfFnhT1tuktX+1JxU918426jEzDboc3j6fnX1EXNvhmbfqtaBOvNGorVeh5jll4Wx4NJK21KoW5oZlmJp0A+AQBFFeGf2FGs/ih6KmDeOq4hLL5F3OkssJ98T+ILqEnaRvDPeEvnZtet+45spsxY6tWn91eUrOIQHRMCetQTdm7h52KZx7CBgkHqmWbP/0bIf/x4hOSRop+URDPU21s2dZqH85sdtOl/8q4YgcJ/5SRLiE8DHBXvw0VLT+kZbW4f8/BZMQwnjVu3pvBtOnqQ25irL7rz2kbraZPF46KzqgZTh1e80zF2abB/eg+DBONVb3FuN9gozdr2Qa9Jq7tzsRiPUfmlypaAZzwTQgLxXtAtF14ZFq9a8YnZJ5pa6rcQvVw3uLd9AmIfvfqQ/LNgTeoT3PEaRcqQtGNop8bDmK7ifcksezWX5U7SyM/0t6m+WYycwkng4j5+8XrHG5tSy+LT8qfPTAWjmZNBhkJOaH/cEbYkaVS3RDzQtaVsQeOUP4Tf7jKg79AYbxXhe+koq1EzCCAvkGCSqGSIb3DQEHAaCCAuoEggLmMIIC4jCCAt4GCyqGSIb3DQEMCgECoIICpjCCAqIwHAYKKoZIhvcNAQwBAzAOBAjSpCrXcmYGwgICCAAEggKACZtnbRh8ob+PZapYfsLE0JUnVDpnhoefsRHa7Q2y0fJteFWfkdWr8/DA5//emuVFUZNk83Bb/s+I9/tZ2D6w27ggYzXB071VyCmXTGDVP5dgEPWIlhV/BbypaUOn6pxv/ph6FC7N+ksE6I0Lm3a1t2rgiRgojezM6h6kQGJ9vDHG0bf9qlvfXoS9styn2/RcX9isaW+b49jh8GE7YgVCYQQiUXLGAt/HLxSqpL+ues0rLXFtTpytfA1roXzWjIWzT2cmQz8ye4Q7yy9fBY+x4sReQHh7abbEKdeBxpQuq0YlPq/eEW2GgBdDueiS2E9XuOb2SFDA3y1obsKaC59rIokB4xQ/16exwcnkaRxb0i0hDGEjhi2LovZ8tNwQn0zrqEPI2G6V4qcqsKSZ97ou5B6eOXHcmuETtL+e7O07LPfO3lhUy0jBU85y9dNpQKmv8zHS4cXvRwUrNqs5oAFEwWhzh2FX+4q9c9SRckNGTJUN/Q1cISwDPaNZYpwTfWMs5jymP7VkQlVXNiF392FoA5AKKqaZWfGtdrrgS1FMafVsU6wWoBFQVy/suWeZ2xsy9ulvpX1ehgpVTr1V9IpJBiQ+/Qik1sSMhFVDwKBQSg9PKBv8OJlFBX69ejFqgtmtd8ROm/ETluuL4hzH2LPPpmuxIuXSDI2Qf4Pz2O8UIJ04KcRZby6NDmAWmsZ81DMcTlUIiktm2kB8lV+ODe7O89btiKc1ZSBF3rdpYXi1n4ACXTZqn5hok+IbmQ8tEiWHCOh4hkn4iHTZvF6Yp9CSYBoe+zxcIXwxm1VKNcArlYV157B+pkj8phGT4Kg9bZkONjfOmBttB5ax/3NW6Q8rcjElMCMGCSqGSIb3DQEJFTEWBBQGjEkJUwL1ez56e2wXVBI20cYoYDAxMCEwCQYFKw4DAhoFAAQUUhJtj7Mx/Hiu71etQZOKRmsVuXQECGeXzDsZUS9VAgIIAA==
Copy the content of certificate_base64.txt and paste it in a secret in your Azure Key Vault. Copy the content of public_key.pem and place that in a configuration file that can be accessed by your application. Return the public key from your back-end like so:
[Route("Home/Form")]
public async Task<IActionResult> Form()
{
    //........
    return StatusCode(200, Json(_config["RSAPublicKey"]));
}
Here is how we set the public key in our React front-end:
componentDidMount() {
    var self = this;
    fetch('Home/Form',
        {
            method: 'GET',
            headers: {
                'Accept': 'application/json',
                'Content-Type': 'application/json'
            }
        })
        .then(function (response) {
            //Handle the response
        })
        .then((json) => {
            self.setState({ rsaPublicKey: json.value });
            return json;
        })
        .catch(function (error) {
            console.log(error);
        });
}
Using jsencrypt, we then encrypt the payload prior to submitting it to the back-end:
handleSubmit = event => {
    var messageJson = JSON.stringify({
        Message: this.state.messageText
    });
    var encrypt = new jsencrypt.JSEncrypt();
    encrypt.setPublicKey(this.state.rsaPublicKey);
    var encryptedMessageJson = encrypt.encrypt(messageJson);
    var wrapperJson = JSON.stringify({ encryptedMessageJson });
    fetch('Home/Submit',
        {
            method: 'POST',
            headers: {
                'Accept': 'application/json',
                'Content-Type': 'application/json'
            },
            body: wrapperJson
        }).then((response) => {
            //Handle the response
        }).catch(function (error) {
            console.log(error);
        });
    event.preventDefault();
}
As seen from the code, we first create a JSON object with the content. For example:
{"Message":"Hello world!"}
We then encrypt that object, in this case it looks like this after encryption:
YvFKXD+qxWXvtD8czxDA60LFUKkGr/4bgu+adt4uYdb43cvgGy4h9cUzIlxStX2q/uHe0LNBah4fyCMVWOYANigUFz29eCxNTWykO01WGCl+A1YNL8i3g1OMfBVi2yewiJRv0d37crWy+ZET8IBwajSt8WZivN5Wr9fJXMCp5cU=
We then wrap the encrypted object inside another JSON object so we can POST the JSON to the back-end.
We are now ready to start the decryption process in the back-end. We do that by fetching the base64 string of the certificate PFX file in Azure Key Vault, convert that to a X509Certificate2 object, get the private key from that object and proceed to do the RSA decryption in C#:
[HttpPost("Home/Submit")]
public async Task<IActionResult> Submit([FromBody]Wrapper wrapperJson)
{
    //........
    var cert = await GetCertificateAsync();
    var rsaCng = (RSACng)cert.PrivateKey;
    var decryptedMessageJson = Encoding.UTF8.GetString(rsaCng.Decrypt(Convert.FromBase64String(wrapperJson.EncryptedMessageJson), RSAEncryptionPadding.Pkcs1));
}

private async Task<X509Certificate2> GetCertificateAsync()
{
    var azureServiceTokenProvider = new AzureServiceTokenProvider();
    var keyVaultClient = new KeyVaultClient(new KeyVaultClient.AuthenticationCallback(azureServiceTokenProvider.KeyVaultTokenCallback));
    var secret = await keyVaultClient.GetSecretAsync("https://path/to/key/vault").ConfigureAwait(false);
    var pfxBase64 = secret.Value;
    var bytes = Convert.FromBase64String(pfxBase64);
    var coll = new X509Certificate2Collection();
    coll.Import(bytes, "certificatePassword", X509KeyStorageFlags.PersistKeySet | X509KeyStorageFlags.MachineKeySet);
    return coll[0];
}
Here is how the Wrapper object looks like:
public class Wrapper
{
    public string EncryptedMessageJson { get; set; }
}
And that’s it! Pretty cool and straightforward, right? Leave a comment below and have fun securing your awesome applications!