Getting Started with WPF MVVM
Once a developer becomes comfortable with WPF and MVVM, it can be difficult to differentiate the two. - Josh Smith
I couldn't agree more with Smith. I actually take it to the extreme and say that if you are working with WPF today without the MVVM design pattern, then you are definitely doing it wrong. Code-behind is the enemy, isolating your components through MVVM increases testability, maintainability and readability of your code. These are all essential in the clean code paradigm, so it would be illogical not to apply MVVM to your WPF code.
In the following guide I explain how you can build a simple Hello World WPF MVVM application. There are many MVVM toolkits out there, I prefer Laurent Bugnion's MVVM Light Toolkit for its light weight capabilities.
Creating a Hello World WPF MVVM Application
In Visual Studio, create a new WPF application project. Go to NuGet, search for and install "Mvvm Light" to the project. You'll see that a "ViewModel" folder was added with two classes inside it; ViewModelLocator and MainViewModel. Delete the latter class as it's just a sample, the former class however is the locator class that WPF uses to data bind views with their respective view models, so we'll need that. Create a "SenderViewModel" class and add it to the ViewModel folder:
public class SenderViewModel : ViewModelBase
{
public RelayCommand OnClickCommand { get; set; }

public string TextBoxText
{
get;
set
{
    _textBoxText = value;
    RaisePropertyChanged("TextBoxText");
}
}

public SenderViewModel()
{
    OnClickCommand = new RelayCommand(OnClickCommandAction, null);
}

private void OnClickCommandAction()
{
var viewModelMessage = new ViewModelMessage()
{
    Text = TextBoxText
};
Messenger.Default.Send(viewModelMessage);
}
}
Note the inheritance from ViewModelBase, and the public properties that we will be using to bind to our view. We are also using messaging here (which follows with the toolkit) to send messages from this sender view model. Create a folder called “Messages” and add a “ViewModelMessage” class to it:
public class ViewModelMessage : MessageBase
{
public string Text { get; set; }
}
Note the inheritance from MessageBase. Now go to ViewModelLocator and in the code rename “MainViewModel” to “SenderViewModel”, build solution. Create a folder “View” and add a “SenderView” User Control (XAML) to it:
<UserControl x:Class="WpfApplication1.View.SenderView"
xmlns="http://schemas.microsoft.com/winfx/2006/xaml/presentation"
xmlns:x="http://schemas.microsoft.com/winfx/2006/xaml"
xmlns:mc="http://schemas.openxmlformats.org/markup-compatibility/2006"
xmlns:d="http://schemas.microsoft.com/expression/blend/2008"
xmlns:i="http://schemas.microsoft.com/expression/2010/interactivity"
xmlns:Command="http://www.galasoft.ch/mvvmlight"
mc:Ignorable="d"
d:DesignHeight="300" d:DesignWidth="300" DataContext="{Binding Source={StaticResource Locator}, Path=SenderViewModel}">
<Grid>
<Label Content="Sender" Margin="90,34,0,232"/>
<TextBox HorizontalAlignment="Left" Width="120" Height="20" Margin="50,266,0,11" Text="{Binding TextBoxText}"/>
<Button Content="Send" Width="50" Height="25" Margin="183,265,67,10">
<i:Interaction.Triggers>
<i:EventTrigger EventName="Click">
<Command:EventToCommand Command="{Binding OnClickCommand}" />
</i:EventTrigger>
</i:Interaction.Triggers>
</Button>
</Grid>
</UserControl>
As you can see, DataContext="{Binding Source={StaticResource Locator}, Path=SenderViewModel} is where the magic happens. The data binding is done here, where the source refers to ViewModelLocator which has the key “Locator” that’s automatically referenced inside App. Note how the text box element is bidden to the TextBoxText property that’s defined in the view model. Finally, note how a trigger is defined to fire on the click event of the button element, bidden to the OnClickCommand relay command property. Now go to “MainWindow” and add the following XAML code inside the grid tags:
<Grid>
<Grid.RowDefinitions>
<RowDefinition Height="Auto" />
</Grid.RowDefinitions>
<Grid.ColumnDefinitions>
<ColumnDefinition Width="Auto"/>
<ColumnDefinition Width="Auto"/>
</Grid.ColumnDefinitions>
<view:SenderView Grid.Row="0" Grid.Column="1" />
<GridSplitter HorizontalAlignment="Left" Width="5" Height="320" Margin="245,0,0,-21"/>
</Grid>
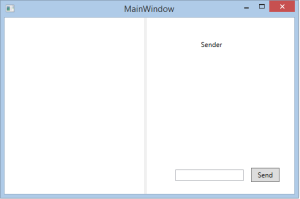
Build and run solution, the application will start:

We have finished the sender part, what remains now is the receiver. Create a “ReceiverViewModel” class and add it to the ViewModel folder:
 public class ReceiverViewModel : ViewModelBase
{
private string _contentText;

public string ContentText
{
get { return _contentText; }
set
{
_contentText = value;
RaisePropertyChanged("ContentText");
}
}

public ReceiverViewModel()
{
Messenger.Default.Register<ViewModelMessage>(this, OnReceiveMessageAction);
}

private void OnReceiveMessageAction(ViewModelMessage obj)
{
ContentText = obj.Text;
}
}
Note how the receiving message is registered in the constructor. It is important to register for a message type prior to sending the message, otherwise the receiving view model won’t receive the sent message, which makes sense. Now go to ViewModelLocator and register the view model you just created:
public class ViewModelLocator
{
public ViewModelLocator()
{
    ServiceLocator.SetLocatorProvider(() => SimpleIoc.Default);</p>

    SimpleIoc.Default.Register<SenderViewModel>();
    SimpleIoc.Default.Register<ReceiverViewModel>();
}

public SenderViewModel SenderViewModel
{
    get
    {
    return ServiceLocator.Current.GetInstance<SenderViewModel>();
    }
}

public ReceiverViewModel ReceiverViewModel
{
    get
    {
    return ServiceLocator.Current.GetInstance<ReceiverViewModel>();
    }
}

public static void Cleanup()
{
// TODO Clear the ViewModels
}
}
Create a “ReceiverView” User Control and add it to the “View” folder:
<UserControl x:Class="WpfApplication1.View.ReceiverView"
xmlns="http://schemas.microsoft.com/winfx/2006/xaml/presentation"
xmlns:x="http://schemas.microsoft.com/winfx/2006/xaml"
xmlns:mc="http://schemas.openxmlformats.org/markup-compatibility/2006"
xmlns:d="http://schemas.microsoft.com/expression/blend/2008"
mc:Ignorable="d"
d:DesignHeight="300" d:DesignWidth="300" DataContext="{Binding Source={StaticResource Locator}, Path=ReceiverViewModel}">
<Grid>
<Label Content="Receiver" Margin="90,34,0,232"/>
<Label Content="{Binding ContentText}" FontSize="20" Margin="65,255,40,0"/>
</Grid>
</UserControl>
For the final step, go to MainWindow and include the ReceiverView:
<Window x:Class="WpfApplication1.MainWindow"
xmlns="http://schemas.microsoft.com/winfx/2006/xaml/presentation"
xmlns:x="http://schemas.microsoft.com/winfx/2006/xaml"
xmlns:view="clr-namespace:WpfApplication1.View"
Title="MainWindow" Height="350" Width="525">
<Grid>
<Grid.RowDefinitions>
<RowDefinition Height="Auto" />
</Grid.RowDefinitions>
<Grid.ColumnDefinitions>
<ColumnDefinition Width="Auto"/>
<ColumnDefinition Width="Auto"/>
</Grid.ColumnDefinitions>
<view:ReceiverView Grid.Row="0" Grid.Column="0" />
<view:SenderView Grid.Row="0" Grid.Column="1" />
<GridSplitter HorizontalAlignment="Left" Width="5" Height="320" Margin="245,0,0,-21"/>
</Grid>
</Window>
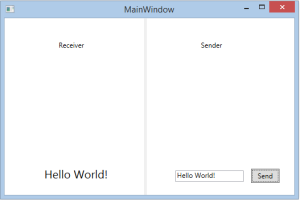
Build and run solution, the final product:
That's pretty much it. In this simple guide, we have demonstrated the use of the MVVM design pattern in WPF, something which any WPF developer should be comfortable to work with. Enjoy!
